What does one do when she's supposed to be cleaning, and painting, and fixing?
She spends an entire weekend making ugly potholders, that's what!
It all started when I decided to make (oh, this will be so easy) matching pot holders to go with the aprons that, time permitting, I've been sewing.
Luckily I made a sample (or two or three) before cutting into the fabric that was purchased on line and I didn't feel like paying shipping fees yet once again, thank you very much!
After a sweaty 3 hours I finished my first one!
Oh my God people! This is a pot holder! This is not couture sewing! How hard can it be?
First of all, bias tape is not my friend.

Sample # 1.
Way too much time and fabric went into the bias strips. And since the tape was to go around curves, the strips had to be cut on the bias.

Trying to sandwich the 2 layers of fabric + 2 layers of Isul-Brite, between the bias tape, ended up looking awful.

Pot Holder # 2.
Not too bad from a distance and/or with a beverage or two.
I thought I was very clever when I decided to serge the sandwiched layers together before attempting to apply the bias tape.

But hideous up close.
Even with pricey, purchased bias tape this took way too long to make.
What embarrassing curves! And I even used my walking foot.

Giving up on the bias tape, I decided to sew right sides together leaving one side open for turning.
Not a bad idea (even though the stripes on the pocket don't line up with the pot holder) but...

...the other side of my poor striped Pot Holder is even uglier!
Something you wouldn't pay a dollar for at a discount store!

A close up of the hideous 'turn the raw turning side in and top stitch'!
I didn't top stitch the whole way around because I knew that the thick outer edges would make for wobbly stitching!
 I was getting very frustrated and combined with PMS that can be a very dangerous thing.
But after a lot of thinking I came up with this:
This is the main body of the Pot holder. A 13 1/2 inch square.
A 9 1/2 square of insul-brite (shiny side down on the wrong side of the fabric)

A 9 1/2 inch square of contrasting fabric (that you can't see here but it's striped) and insul-brite (shiny side of insul-brite to wrong side of fabric), quilted together.
No, that's not binding at the top (remember: binding + Laura = tantrum).
It's 2 pieces of fabric: 1 of the pot holder fabric (7 1/2 X 9 1/2) and 1 of the contrast fabric (6 1/2 X 9 1/2) Sew right sides together at the top only, turn right sides out, line up the raw edges and the shorter side will pull down and create a band of fabric across the top.
Now place the smaller quilted square on top of the bigger quilted square, wrong sides together. Insul-brite will be on insul-brite.

Fold the bigger square in toward the smaller square. Here's the top and bottom edges folded and pressed.
Now the sides have been folded in. Fold just enough so that the raw edges of the outer square touch the smaller square.
For your mitered corners: fold a corner in and pin.
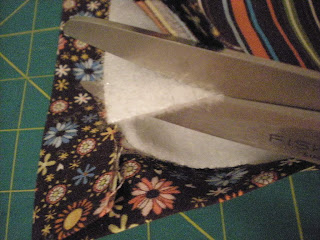
Here's a hint: The insul-brite is thick and this can make it difficult to miter the corners so I trim ONE piece of insul-brite at each corner before all the folding and sewing of the edges.
Note: trim the insul-brite on the POCKET side of the pot holder leaving the pot holder side of insul-brite alone! The pocket side is not the side you'll be using for hot dishes so it can be trimmed.
All the edges have been turned in and pinned in place.
I used my walking foot and zig-zagged around the edges of the folded down band.
Here's my finished pot holder with my hand in the pocket.

Here it is!!! Very pretty, nicely squared corners, and NO BIAS TAPE!!!!
You can attach a loop for hanging if you'd like (just stitch it on a corner with a decorative button).
And I just realized that I didn't include a photo of the front! Well it's just a big square of the flowered fabric and since it will be the 'working' side of the pot holder and it will get dirty anyway, who cares!
And I just realized that I didn't include a photo of the front! Well it's just a big square of the flowered fabric and since it will be the 'working' side of the pot holder and it will get dirty anyway, who cares!
This is the pretty side!
So, what does one do when she's supposed to be preparing her house for sale?
So, what does one do when she's supposed to be preparing her house for sale?
What does one do when she's supposed to be cleaning, and painting, and sewing?
She spends her entire morning blogging about pot holders!!!!!
I really need to get my priorites straight!
I really need to get my priorites straight!
Update:
I've made several of these over the past few years and I now add a layer of Insul-brite to the pocket piece also (6 1/2" X 9 1/2"). It does make for a thick pot holder but by doing so you can protect your knuckles (just in case!). Actually you don't even have to add a pocket and since these are so big you can use them as trivets (and save some fabric).
Or you can cut your 9 1/2" square from a pair of blue jeans and reuse a back pocket like I did here.
http://sewatsea.blogspot.com/2011/02/some-more-boat-sewing-and-wilbur-jumps.html


4 comments:
Those are some cool potholders. I've been wanting to make some of my own but I don't know what to put in the middle? What did you use? Fabric choices? Do tell!
Unfortunately my post went out before I was done therefor causing little miss to puzzle through a half finished entry. But now I'm done. BTW you should use 100% cotton and of course Insul-brite!
Thanks for this. I was so fed up with my awful attempts at bias tape and the ugly end results on what should be sooo easy to sew: potholders of all things.
Good post! I just finished my first pot holder and it looks mutilated. I am going to try your method and I love the fabric you choose.
Post a Comment